Measuring Suggestions
The basic principle used to measure hardness is invariably based on measurement of the resistance force of the penetration of a pin into the test material put under a known spring load. The amount of penetration of the pin (maximum 2.5 mm) is then converted to hardness reading on a scale with 100 units
1. Whenever it is possible, a Durometer measurement should be taken at least 12 mm (approximately 0.500") in from edge of a sample, as the hardness characteristic of any sample changes at the edges.
2. Whenever it is possible, the sample thickness should exceed 6 mm (approx. 0.250"). In case, the sample is thinner than this, the sample can be backed with a sample of the same material to increase the thickness
3. Test blocks should not be used for calibration verification. All samples are usually subject to characteristic changes over a period of time along with temperature as well as lighting conditions, the rated Shore value when supplied as new can and will vary with age. A proper calibration verification requires independent confirmation of the internal spring forces along with the pin displacement verification vs. the value identified on the scale.
Specimens need to be 0.250" thick, with a 1" surrounding area for accurate measurements to qualify for ASTM Durometer testing
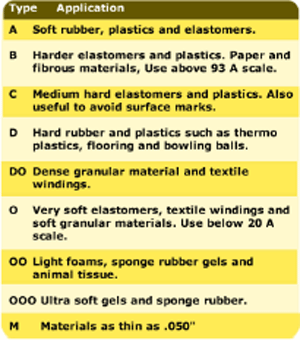
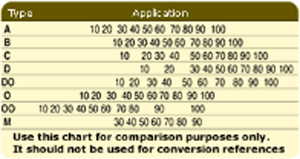
Reference Guide & Scale Comparison


|

 Certified Comapny
 Certified Comapny